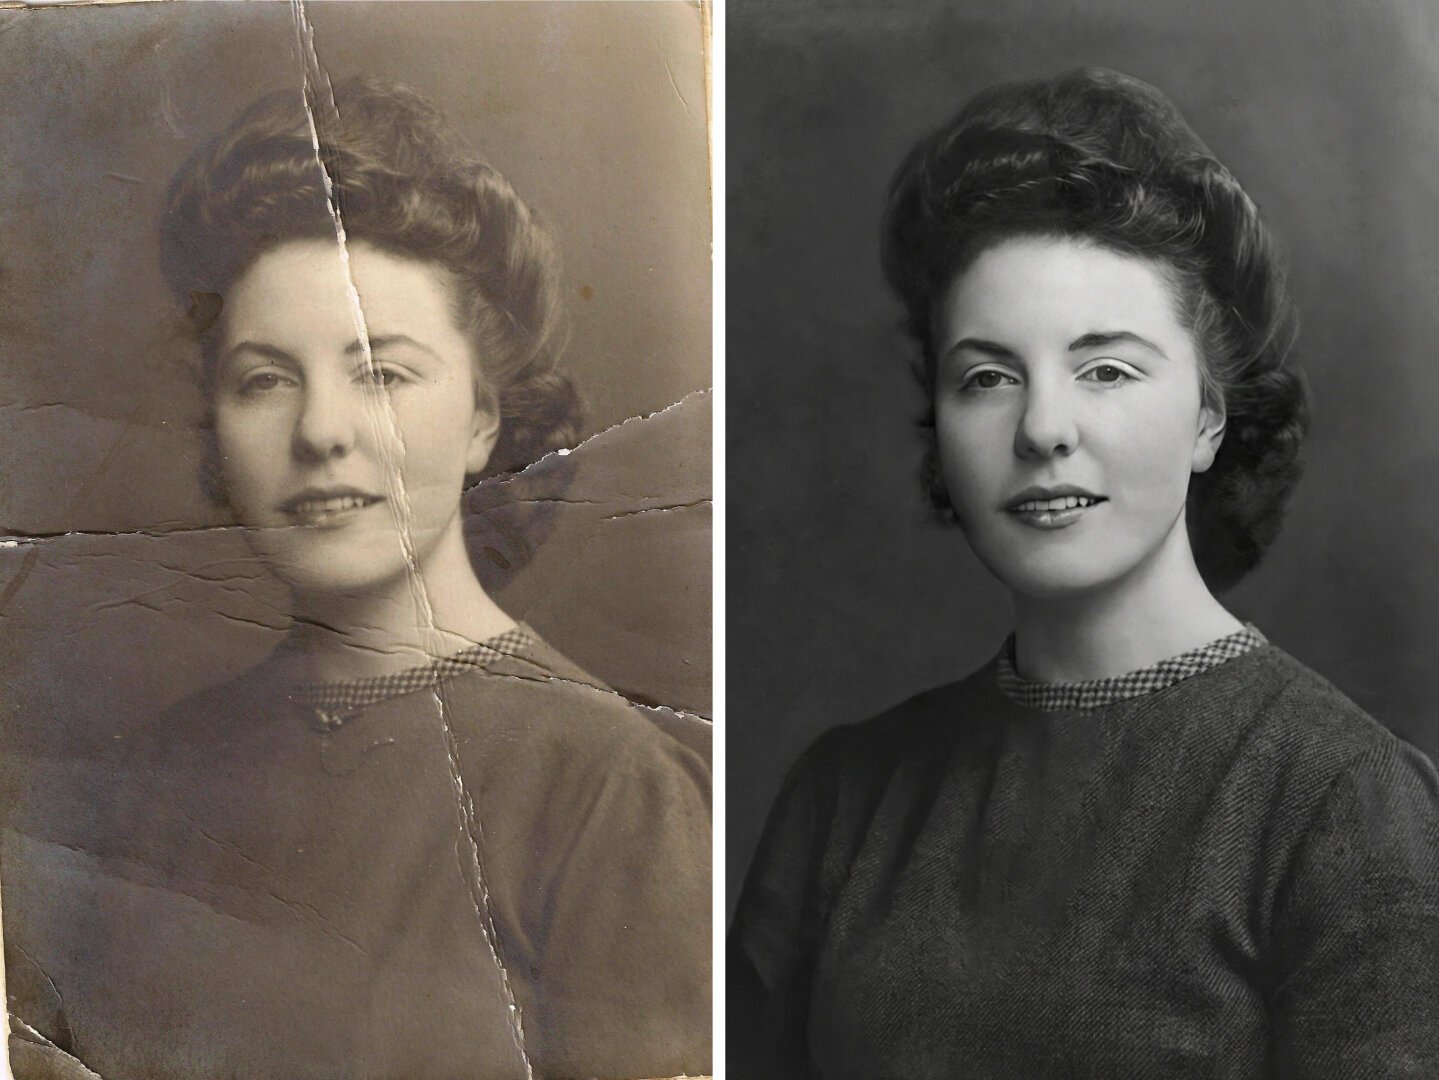

Photo restoration is the process of repairing old, damaged, faded, or incomplete photographs to improve their visual quality and preserve important memories. Modern photo restoration combines traditional techniques with advanced AI tools, making it possible to recover details that were once considered permanently lost.
This guide explains what photo restoration is, the most common types of damage, available methods and tools, step-by-step processes, and practical tips for achieving high-quality results.
What Is Photo Restoration?
Photo restoration involves repairing and enhancing photographs that have suffered physical or digital damage. The goal is to bring the image as close as possible to its original condition or, in some cases, to improve it beyond the original quality while keeping a natural look.
Common goals of photo restoration include:
- Removing scratches, tears, and stains
- Correcting faded colours
- Fixing water damage or mould marks
- Reconstructing missing parts of the image
- Improving sharpness and clarity
- Converting black-and-white photos to realistic colour
Common Types of Photo Damage
Understanding the type of damage helps determine the best restoration approach:
- Physical scratches and tears
- Fading caused by sunlight or age
- Water damage and stains
- Mould or mildew spots
- Creases and folds
- Missing sections or torn corners
- Low resolution or blurry scans
- Colour shifts and yellowing
- Dust and spots
Each type of damage requires different techniques and levels of effort.
Photo Restoration Methods
There are three main approaches used today:
1. Manual Restoration
Performed by skilled professionals using software such as Adobe Photoshop. This method offers the highest level of control and is ideal for valuable or complex photographs.
2. AI-Powered Restoration
Modern AI tools can automatically remove scratches, colourise black-and-white photos, enhance faces, and reconstruct missing areas. These tools are fast and accessible for beginners.
3. Hybrid Approach
Many professionals combine AI tools for initial cleanup with manual refinement for the best final quality. This method balances speed and precision.
Popular Tools for Photo Restoration in 2026
Several tools are widely used for different needs:
- Adobe Photoshop (professional manual control)
- AI-based online services for automatic restoration and colourisation
- Specialised desktop software focused on photo repair
- Mobile apps for quick fixes and enhancements
- High-quality scanners for digitising physical photos
- Basic photo editing software for lighter repairs
The right tool depends on the complexity of the damage and the desired quality level.
Step-by-Step Photo Restoration Process
A typical professional workflow includes these stages:
- Digitise the original photo using a high-quality scanner
- Create a working copy and keep the original file safe
- Assess the type and severity of damage
- Correct overall exposure, contrast, and colour balance
- Remove scratches, dust, and stains
- Reconstruct missing or damaged areas
- Enhance facial details and important elements carefully
- Apply final sharpening and noise reduction
- Review the result at different zoom levels
- Save the restored version in high resolution
Working in layers and keeping non-destructive edits is strongly recommended.
Tips for Better Restoration Results
- Always scan at a high resolution (at least 300 to 600 dpi)
- Work on a duplicate file, never the original scan
- Zoom in closely when repairing fine details
- Avoid over-sharpening or over-smoothing faces
- Match the original photo style rather than making it look artificial
- Take regular breaks to keep a fresh perspective
- Compare the restored version with the original frequently
- Do not oversaturate colours
When to Hire a Professional
Consider professional help in these situations:
- The photo has significant missing areas
- The image is a rare or highly valuable family record
- Previous restoration attempts made the damage worse
- You need museum-quality or print-ready results
- Multiple photos require consistent high-quality work
Professionals bring experience that automated tools cannot fully replace.
Common Mistakes to Avoid
- Using low-resolution scans as the starting point
- Overusing automatic filters without manual checks
- Making faces look unnaturally smooth
- Ignoring colour accuracy
- Saving only in low-quality formats
- Working directly on the original file
Key Takeaways
- Photo restoration repairs and enhances damaged or aged photographs
- Both manual and AI-powered methods are effective when used correctly
- High-quality scanning is the foundation of good results
- A careful, layered approach produces the most natural outcome
- Valuable or complex photos often benefit from professional expertise
Frequently Asked Questions
Can AI fully restore heavily damaged photos?
AI can handle many common issues well, but heavily damaged or incomplete photos usually need manual work for the best results.
Is it possible to restore a torn photo?
Yes. Missing sections can often be reconstructed by skilled restorers or advanced AI tools, especially when surrounding details provide enough context.
Should I restore the original physical photo or a scan?
Always work on a digital scan. The original physical photo should be preserved as is.
How long does photo restoration take?
Simple repairs may take minutes with AI tools. Complex manual restorations can take several hours or longer depending on the damage.
Is it possible to colourise old black-and-white photos?
Yes. Both AI tools and manual techniques can add colour, though results vary in accuracy and natural appearance.







Leave a Reply